Introduction:
Launching a business is one thing, managing it is another. The most important aspect in any business is to gain as many customers as possible. When it comes to online businesses our platform offers valuable CRM features that do the manual job automatically and allow you to focus on more important marketing strategies. Here we are to discuss how you can use Automatescale to create and sell digital products.
Benefits of Digital Products
Digital products can be sold on autopilot mode meaning you can sell products when you are sleeping. Your sales funnel works automatically providing revenue and profit. Using Automatescale’s funnel building feature you can save time and manage your digital marketing more effectively. Thus, if you have digital products, make sure you use Automatescale CRM features.
Another big advantage of digital products is that you have zero inventory. In case you don’t have much money to invest into your business, you can start creating digital products and sell them online. It’s quite easy to create digital products by adding content and your experience. If you offer something unique in the digital industry chances are high you can become a successful digital product seller.
Additionally, you should note that you need to use special tools and features to stand out in the market. Luckily, Automatescale comes with all the necessary tools and features to help you find customers and sell your digital products. You can create communities, use appointment booking features, gain customers, sell courses, ebooks, content and websites through your Automatescale account.
Creating a Product
To make things easier for you, we’ll first go through the creation of a product from scratch. Follow this step-by-step guide and you’ll easily create your first digital product. Then we’ll dive into the details to learn how to sell the product.
Go to ‘Memberships’ on the left of your Automatescale account.
Go to ‘Courses’ on the top and click on ‘Products’. ‘Create a new product’.
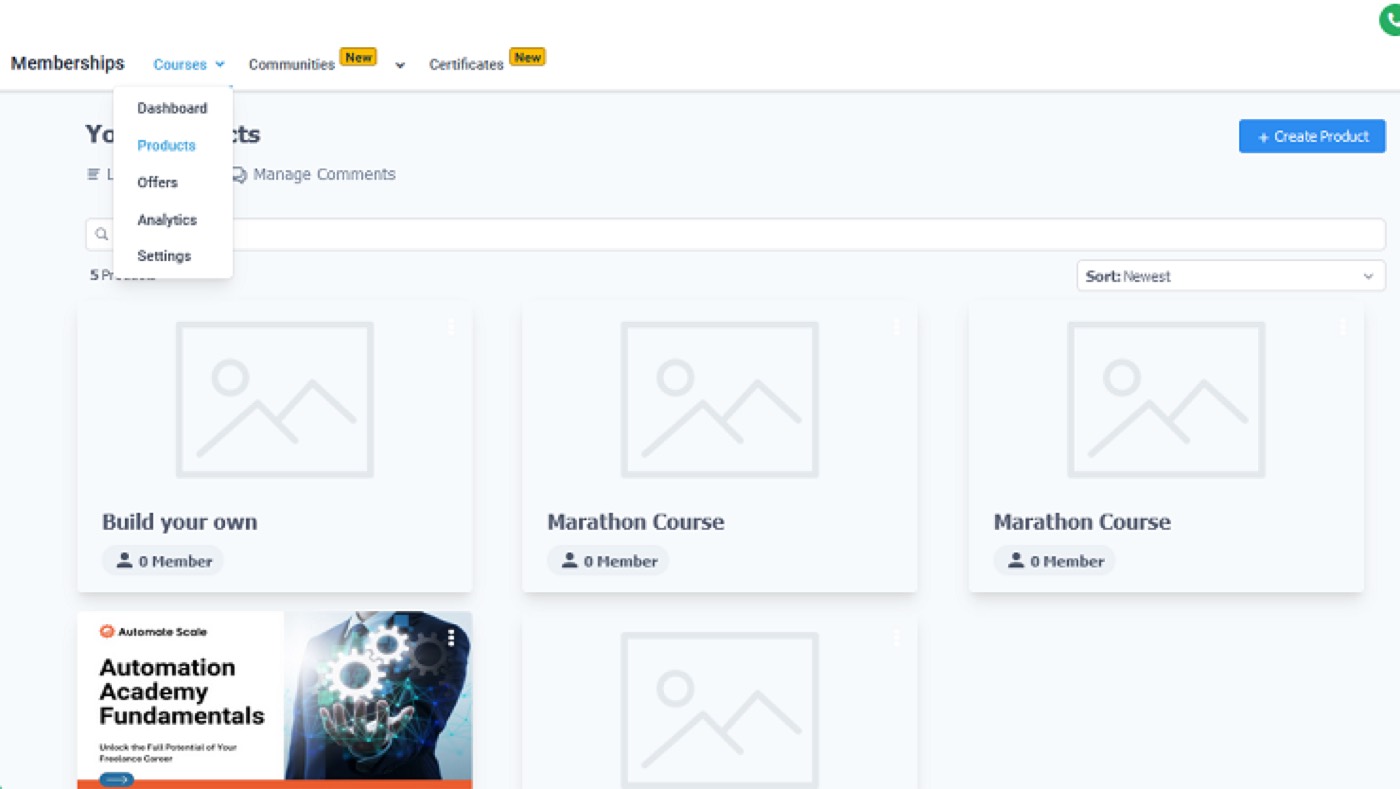
Select ‘Build your own’. Name the product. It can be a course, a journal, a planner, a tutorial or whatever. Click on ‘Create product’.
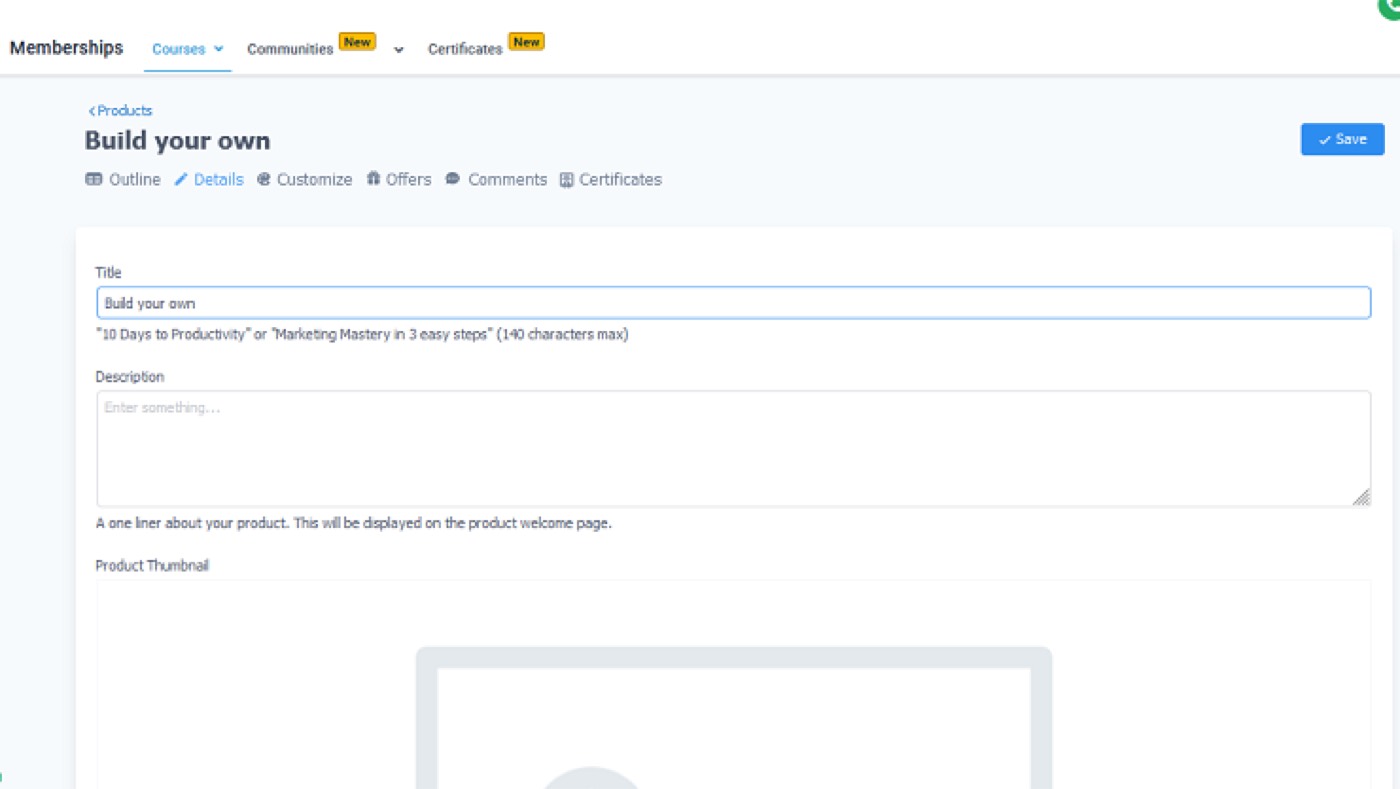
Next, you can add content, categories, sub-categories, tests and assessments to your product. You can rename your product, course, etc.
The platform allows you to attach images, videos, testimonials, engaging templates, files and other useful details to your post. It’s also recommended to share some tips and instructions on how to download and use your product. You can ask your users to leave feedback on your product, follow you on social media, and recommend your product to a friend if they like to. This will make your product look more user-friendly and attractive. Don’t forget to save each of your steps. Once you save all of the steps, you can preview what you have.
Selling a Digital Product
Now, let’s see how you can sell a digital product in Automatescale. Your next step is to take your product and turn it into a payable offer. Then we’ll create a funnel page and finally we’ll go through the actual steps of selling the product.
Building a Product Offer
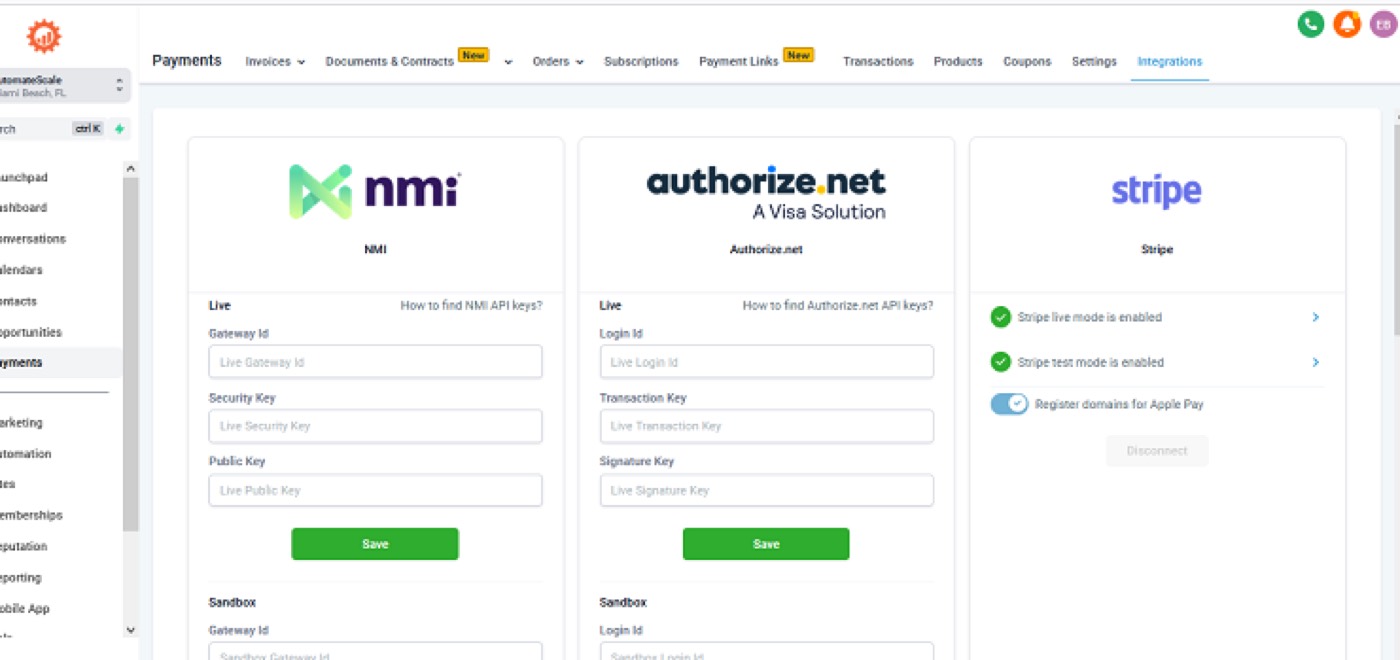
First of all make sure you set up and connect a payment method by going to ‘Payments’ - ‘Integrations’ section.
Then, go to ‘Courses’ on the top of your account page and click on ‘Offers’.
Click on ‘Create offer’ on the right side.
Now you see empty fields. Fill in the required fields according to your product/offer. You can include multiple products in one offer or you can choose to have only one product inside one offer.
Once you fill out all the fields, click on ‘Create’.
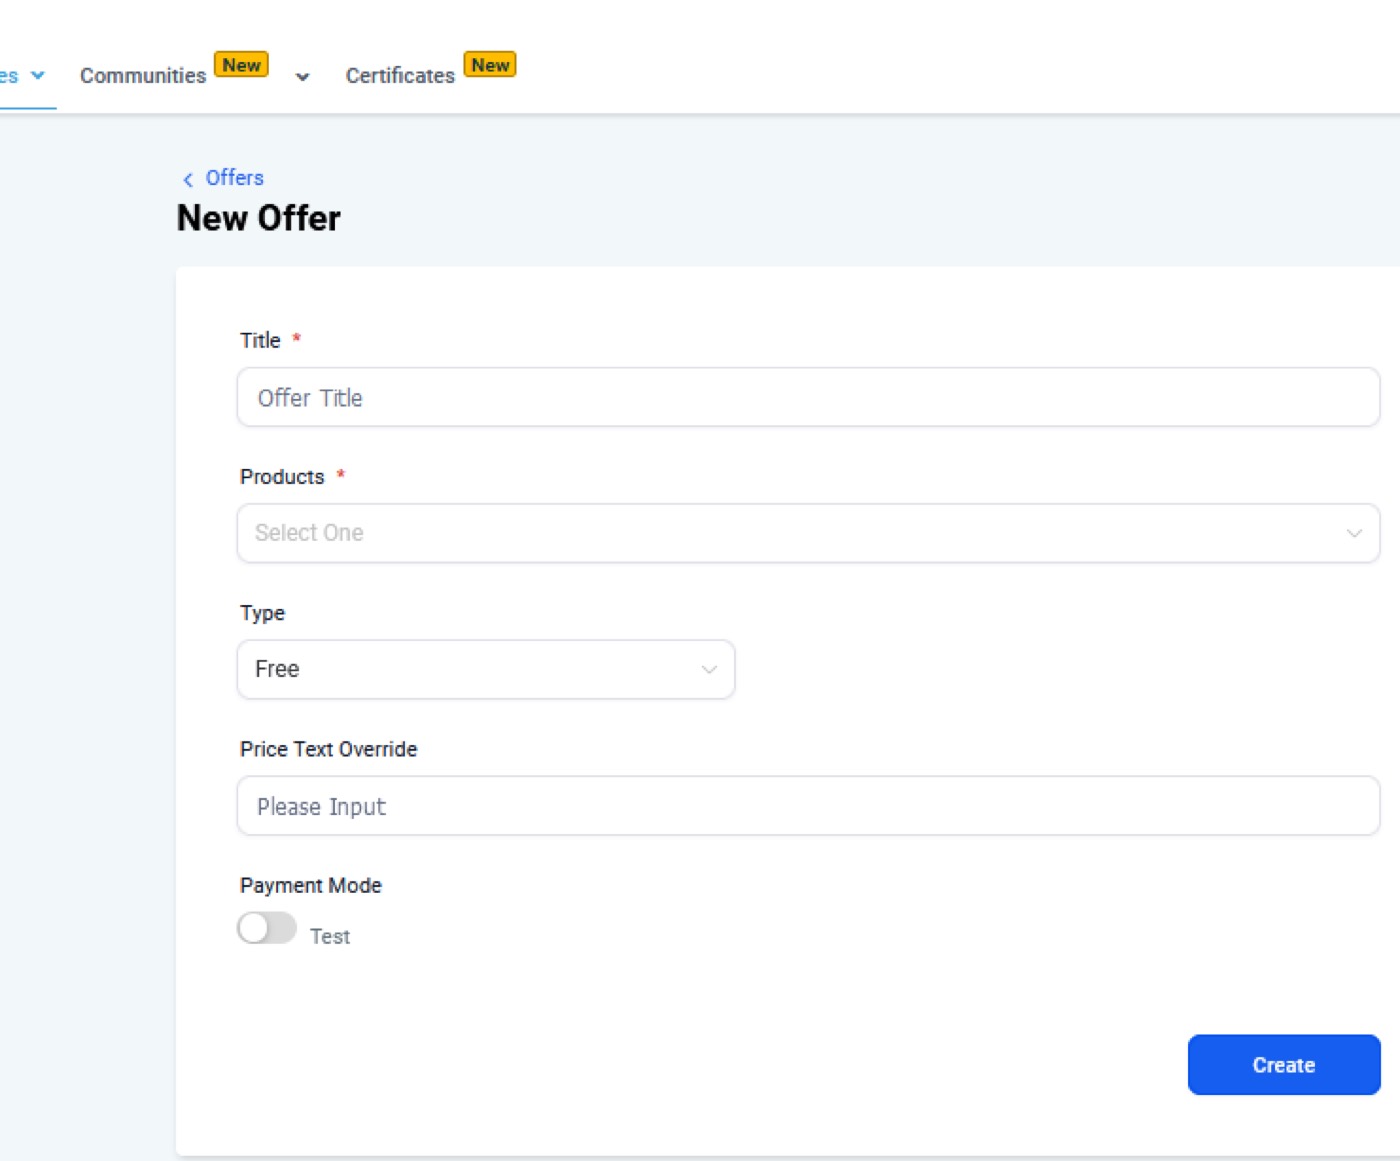
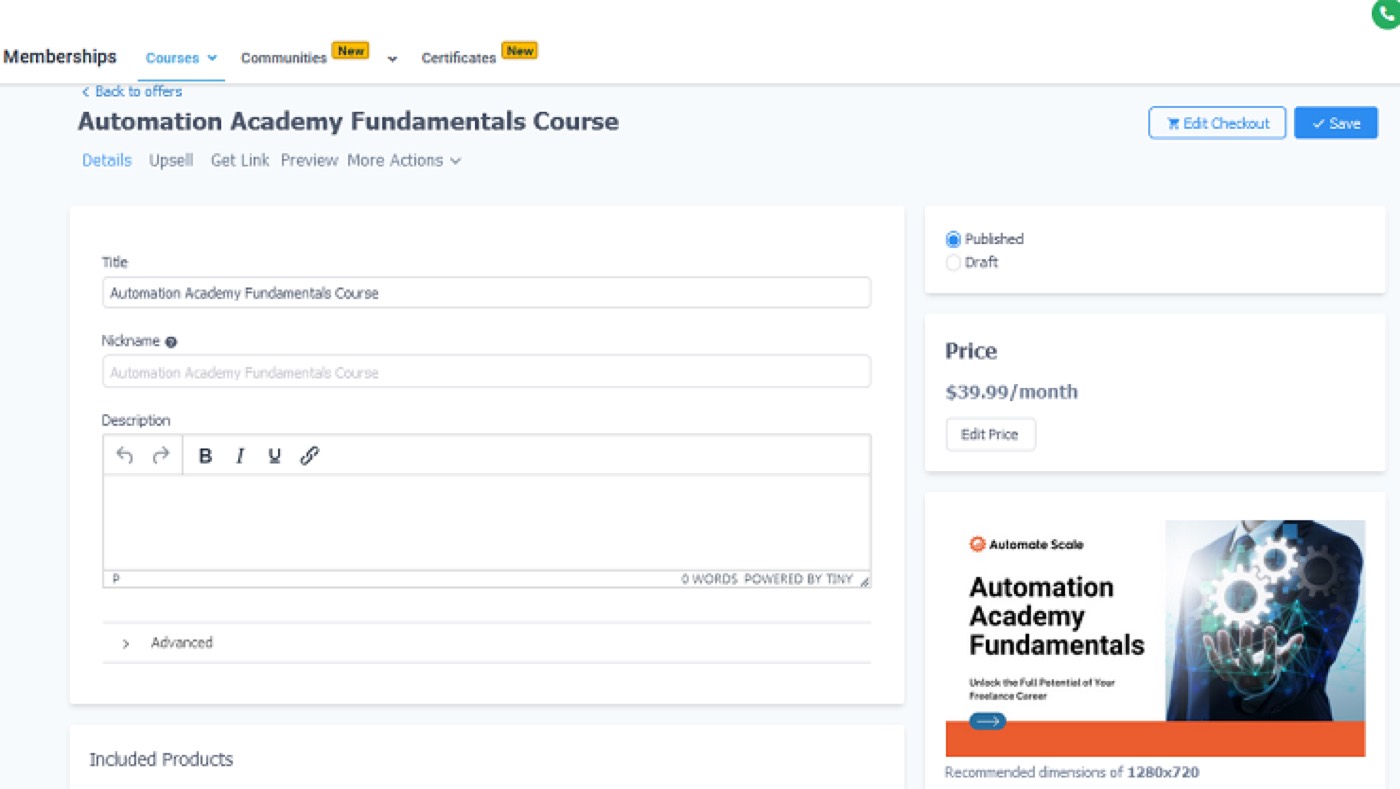
On the next page, you can make any changes you want. You can add a product description text, checkout description text, upload images, videos, edit the price of the product, etc.
Then make the offer ‘Published’ instead of leaving it in ‘Drafts’ and ‘save the action.
Now you can preview your offer details and edit them anytime you want to make changes. You can control the upsells and work on other features to make your offer as attractive as possible.
Creating the Sales/Funnel Page
At this stage we are done with creating the product offer and now we can go to the sales page to see how you can create a funnel page to sell your product.
Go to ‘Sites’, ‘Funnel’, and click on ‘New Funnel’
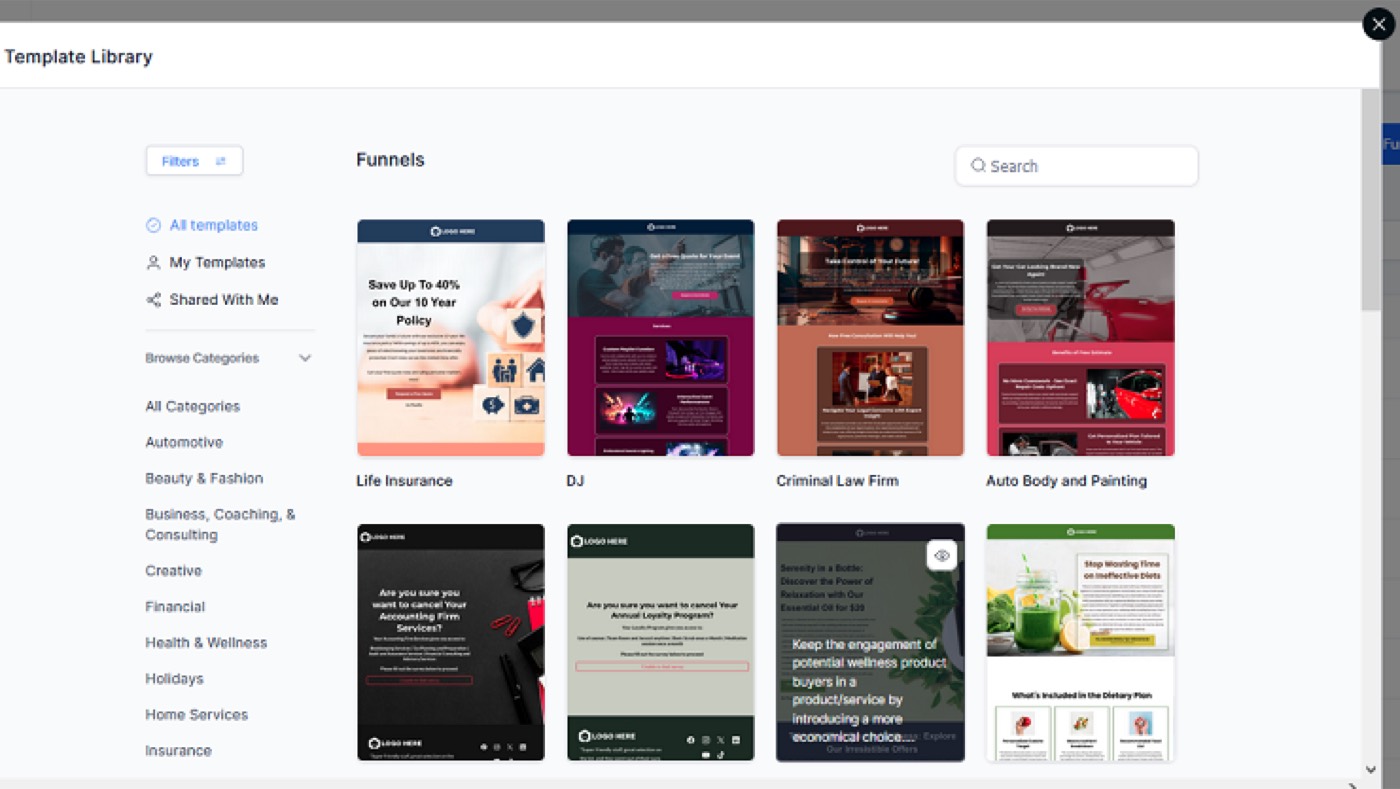
Select either from scratch or templates. Click on ‘Continue’.
Create a template or choose one from the template library according to your product and offer type.
The funnel builder allows you to play with designs, add images, logos, content, elements, additional sections and whatever you might find necessary to describe your offer. Try to make it simple, reader-friendly and informative at the same time.
Sell the Product
While creating the sales page, make sure you add a ‘Get started’ button for your customers to click on and buy your product. You can put it in the middle of your sales page and make it eye-catching. It’s up to you how to offer your product. You can type ‘download our product’ instead of ‘get started’ and connect a URL or file to it. When they click on the button they’ll be redirected to the download page.
On the other hand, if you choose a template from the library, it will automatically offer all the necessary buttons and features for selling the product. Once a user clicks on the button, they’ll see a window with fields requesting client’s information and checkout.
By filling out the fields, they’ll click on checkout and purchase your digital product. At this stage you have linked up your product with the sales page. There are several final steps inside the Funnel page and Automation that you need to take and finish with selling actions.
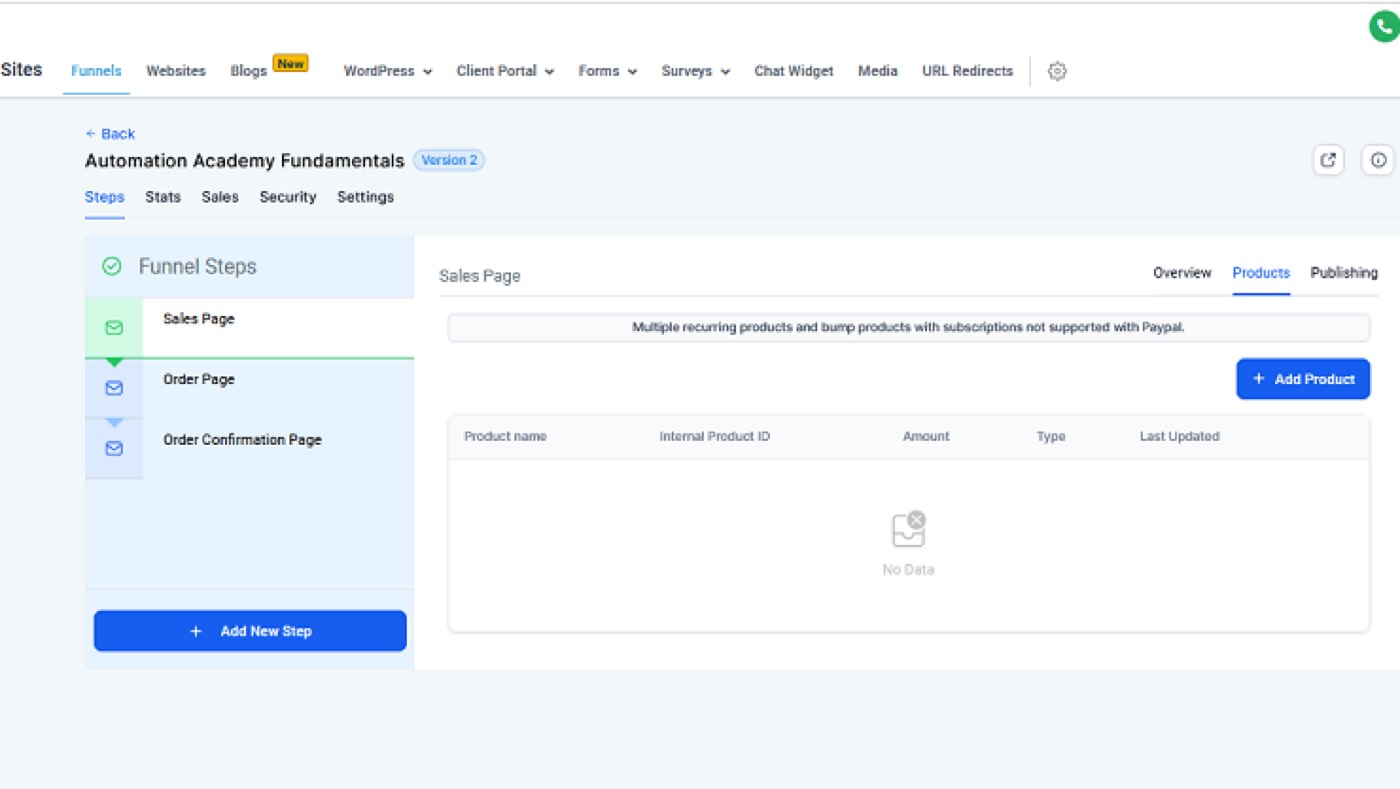
Go to ‘Sites’, ‘Funnels’. Here you’ll see the overview of your product. Click on ‘Products’ Next to ‘Overview’ on the right side of the page.
Click on ‘Add product’. Here you can find all the products you have created. Select the product you want to sell. Fill out the further fields and click on ‘Save’.
Preview the result, make the final changes, save and voila! Your digital product is ready to be sold.
Thank you Page
If you like, you can add a ‘Thank you’ note to your product. Once the client opens your offer they’ll see a ‘thank you’ note. You can find this feature inside the final page of your product. Click on preview and click on the icon next to ‘Save’. It will offer ‘Home’ and ‘Thank you’ sections. Click on ‘Thank you’. Add a text into your ‘Thank you’ note. Save the actions.
Automation
Last but not least you are supposed to go to automation.
Click on ‘Automation’ on the left of your account page.
Go to ‘Workflows’. Click on ‘Create Folder’. Name the folder.
Next, click on ‘Create workflow’.
Select ‘Start from scratch’. Name the workflow according to your product name.
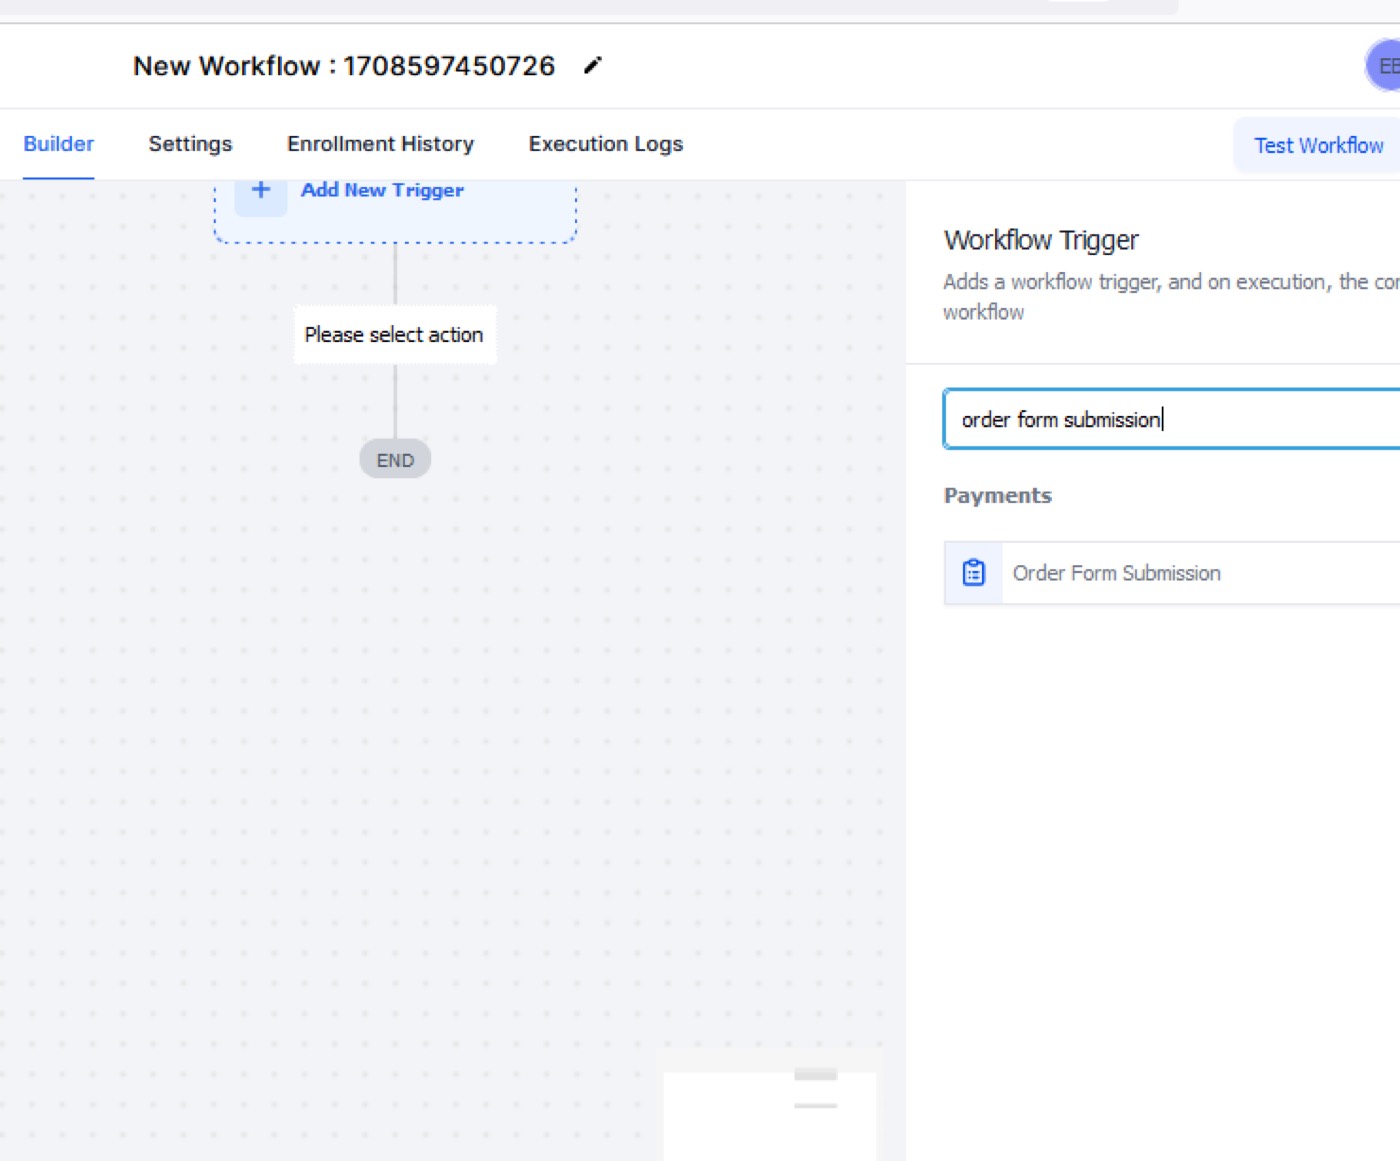
Click on the ‘Add New Workflow Trigger’. Select ‘Order Form Submission’. Add filters like ‘In Funnel/Website’ and ‘Automation Plans’. Save the trigger.
Continue creating actions by clicking on the (+) sign. Add a method of communication such as email, sms, call, etc. Add a subject and text. Personalize the message in ‘Custom Values’ and save the action.
You can continue adding other actions that you find necessary for your workflow automation. There are many useful features inside the workflow such as ‘Wait’, or Condition features including if/else branches and segments. As a final step at this stage you should go to Workflow Settings. Allow reentry. Add contact details. Put on ‘Publish’ mode and save.
Domain Setup
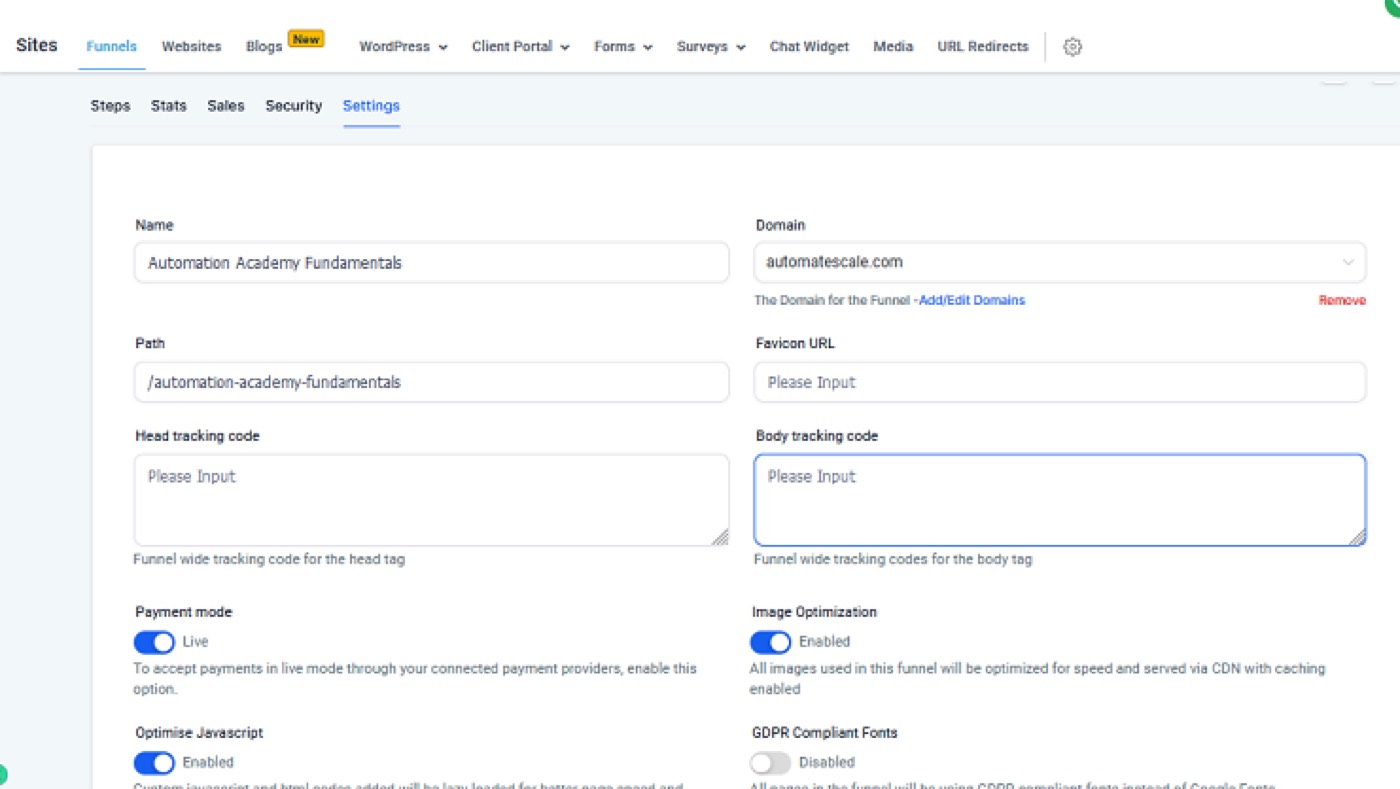
Domain setup is a technical step but it’s an important one if you want to make your URL look nice and memorable. By the way, this is a new Automatescale feature to use. Here is how to set up a domain before testing the final result.
Go to ‘Sites’.
Select the funnel you have created for your product.
Go to Settings. Under the ‘Domain’ section click on ‘Add/Edit domains’, ‘+Add’.
Now you can type the URL name and click on ‘Continue’. It will set up your domain.
Next comes ‘Authorize’ and the further steps to sign in. Connect your domain to LeadConnector.
Link domain with funnel.
Check your domain on a separate window. Type the URL name and it will redirect you to the sales page.
Final Words
As you see, all it requires is a sequence of easy steps to take and create your digital product, then sell it on the platform. Every time you test the final look, you can make changes, edit, add or delete anything you find necessary or unnecessary. You can use so many CRM features inside your account to make the product (course, journal, plan, tutorial, etc.) sellable. You can add a calendar for appointment bookings, or you can create a community to engage more people. Try to be creative and use your marketing skills to gain more customers.
★ Want this built for you? AutomateScale deploys the AI agent layer, funnels, and automations behind this — for agencies, SaaS founders, and coaches. Apply for a strategy call or subscribe to The Scale Brief.